Adequate Infosoft
In this blog, we will build a RESTful API using Nodejs, Expressjs, and MongoDB. This is the first part where we will talk about the basics of building RESTful APIs with the help of NodeJS, ExpressJS, and MongoDB.
Run the below command in an empty folder:
npm init
After running the command, it will ask you to enter various details. You need to enter project names, the repository, the author, and much more. It will generate a file named package.json in the folder.
The package.json file contains all the scripts such as how to test the application, and how to run the application, plus all the dependencies. This NodeJS REST API MongoDB you can built accordingly.
Install some of the dependencies now:
npm i express mongoose nodemon dotenv
>Install NodeJS to restart the server every time you save the file.
ExpressJS is utilized as middleware to create multiple CRUD endpoints.
Mongoose is used for managing your data in MongoDB with the help of multiple queries.
Dotenv helps you to manage a .env file.
Make a file called index.js once they have finished installing. This will serve as our application's starting point.
Let's execute this file after adding Express and Mongoose.
Transfer all the Express contents into a new constant named app.
After this, the server is set to Port 3000. In order to start our server we also need to add app.use. We have a piece of code that enables us to receive the JSON formatted data.
Include the following script in the package.json file:
It also represents the way to start the server with the help of npm start, this will run with the help of Nodemon package that we installed earlier.
Enter the npm in the terminal, and the following output will occur.
To configure the MongoDB Database, you need to log in to> MongoDB create your account, or sign in to the account.
Sign in to the account, we need to create a database.
Create a Free Shared Cluster.
You need to enter the username and password, so fill that information in.
Now, add your IP Address.
Press on the Finish button and close the window.
The process will take some time for the cluster to finish, so you need to wait. After this create a .env file in the folder.
Now on the Home Page of Cluster, press on the connect button.
The below image will appear:
Press on the MongoDB Compass, and you will see the below string. Plus, install the MongoDB Compass.
This string that you have previously used should now include your username and password. The completed connecting string will resemble the following:
The username, in this case, is ‘nishant’, the password comes next, and the database name comes last.
Paste this string into the.env file as a result.
Add the string in MongoDB Compass.
Now, press the connect button.
You will get here two Databases by default. And later third one will be created automatically.
After that, you need to import all the contents to .env file in the script file name index.js.
Now, we need to store the string into a mongoString variable.
You need to connect the database to the server using Mongoose.
Now, depending on whether our database connection succeeds or fails, we must throw a success or an error message.
Database.on in this case indicates that it will attempt to connect to the database and throw an exception if the attempt fails. And database.once indicates that it will only be run once. If it is successful, a notification that reads "Database Connected" will appear.
Below is the code from the start. This is the REST API example that will help you build it.
Creating Routes for the Endpoints
First, you need to create a folder named routes, and inside that folder create a file routes.js.
Import routes.js into our index.js file which is a main script file.
Plus, use the below routes file
Now, the above app.use will take up two main things. The first is the base endpoint and the other one is the contents of the routes. After this, all the endpoints will first use‘/api’.
After this, add something inside the routes file.
How you can write Endpoints
Here, we need to write our endpoints in the route file. We will need five routes to perform the below actions:
Keeping your data to the Database
Receiving all the data from the Database
Getting ID-based data
Updating ID-based data
Deleting ID-based data
Now, we have to create the routes for the below actions:
How to Create Model
We have to create a model that will help us to define our database structure.
First, create a folder with a name model and inside this folder create a file named model.js.
We are using schema to define the database structure. It includes age and name property. Both fields contain types and you will use both of them.
Now, we simply need to export the schema model.
After export, we need to import this inside the file named route.js.
Posting Data to the Database
By using the model, we will create a data body.
We also need to create a try-catch block to handle the errors and success manages.
Along with the data in the response body, we are also sending the success message.
Additionally, if there are any errors, they are received in the catch block.
Let's add some Postman data now. However, for this function to function, it must first be asynchronous. We shall thus employ async-await.
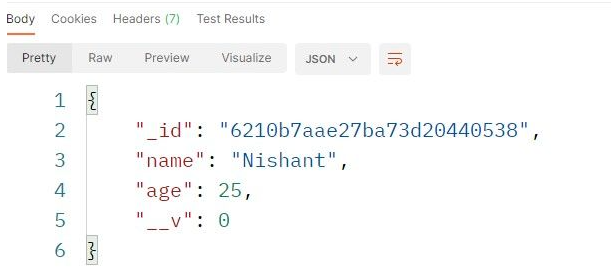
Now when you add the data to the body and click on the Send button, the following result you will get.
The above code is also creating a new ID. You can see the database and record in the MongoDB Compass app.
Get all the Data
The following code will help you get all the data.
We are using new method Model. find to get all the data from the database. After fetching all the data, we will return it in JSON format. In case an error appears, you will get that too.
An array of objects in the Postman body will be returned if we call this endpoint in Postman.
Get a Database on the ID
This one is also easy. All we need to do is pass the document's ID—req.params.id—into the findById method.
After this, when you click on the send button you will get the data based on the ID.
Final Thoughts
Read our full blog to design and develop a RESTful API using MongoDB, Node, and Express. To create a Full-Stack application, these endpoints can now be used with Vanilla JavaScript, React, Angular, Next, or Vue.js.
Suggested blog
>How to delete documents from a mongoDB collection without an error?
>How to overwrite the contents of MongoDB via a put request in Nodejs?
>How to update a document in MongoDB with NodeJS?
>Set up Node.js & connect to a MongoDB Database Using Node.js
>Create a One Page App with Angular.js, Node.js and MongoDB